A curled fern leaf is a symptom, not a diagnosis. The same inward roll can develop when a fern is too dry and when damaged roots cannot supply water to its fronds. Low humidity may curl and dry the margins, while direct sunlight may affect only the side facing a window. Pests can produce curling too, but they usually leave additional evidence such as stippling, webbing, silvery scars, sticky residue or visible insects.
The condition of the tissue matters. A green, flexible frond that has temporarily lost firmness may improve after the underlying problem is corrected. A frond with scorched, brittle, torn or pest-damaged tissue may remain curled even when the plant begins producing healthy new growth.
Is the Curling Normal New Growth?
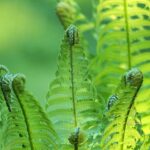
Young fern fronds commonly emerge as tightly coiled structures called croziers or fiddleheads. They gradually unroll as the blade and leaflets develop. This is normal growth rather than a sign that the plant needs more water.
Normal crozier
The curled structure arises from the crown or rhizome, looks fresh and firm, and is located at the growing tip of a new frond. Older fronds remain normally shaped.
Abnormal mature frond
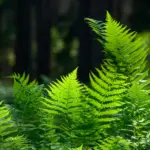
A previously expanded blade begins rolling inward, puckering or contracting. It may also droop, discolor, develop dry margins or show pest damage.
Natural leaf form
Some fern species and cultivars have ruffled, crested, wavy or twisted fronds. Compare the plant with its older healthy growth and a reliable description of that specific fern.
A healthy new frond should continue developing rather than remaining stalled, blackening at the tip or collapsing at the base. Repeatedly damaged new growth may indicate root trouble, environmental stress or feeding by pests.
Curling, Wilting or Crispy Leaves?
These terms describe different changes and should not be treated as interchangeable:
- Curling: The blade or its margins roll, cup or fold inward while the frond may remain upright.
- Wilting: The frond loses firmness and droops because its cells are not maintaining normal water pressure. Both dry roots and damaged, waterlogged roots can produce wilting.
- Shriveling: The blade contracts and becomes wrinkled, often after more advanced dehydration or tissue injury.
- Crispy tissue: The affected area is dry, brittle and dead. It will not become green again.
Brown, dry margins are discussed in more detail in the guide to brown tips and brown fern fronds. Widespread yellowing, particularly when the potting mix remains wet, should also be compared with the causes of yellow fern leaves.
Fern Curling Symptom Diagnosis Table
| What you observe | More likely explanations | What to check next |
|---|---|---|
| Curling with dry potting mix | Underwatering, a root-bound pot, water-repellent mix or rapid drying from heat | Pot weight, moisture below the surface, drainage and how quickly the pot dries |
| Curling with wet potting mix | Poor drainage, overwatering, damaged roots or developing root rot | Drainage holes, odor, root firmness and whether the container remains wet for an unusually long time |
| Curling and crispy edges | Low humidity, repeated drying, sun scorch, heat or salt injury | Room humidity, watering history, window exposure and fertilizer or mineral residue |
| Curling on the window-facing side | Excessive direct sun or localized heat | Duration of direct light, hot glass, bleached areas and recent seasonal changes |
| Curling with webbing or pale speckles | Spider mites | Leaf undersides, joints, fine webbing and moving dots viewed with magnification |
| Curling with silvery scars or black specks | Possible thrips feeding | Young growth, leaf undersides and insects dislodged over white paper |
| Curling after repotting, division or relocation | Root disturbance or a sudden environmental change | Root damage, planting depth, moisture, light, temperature and nearby vents |
| Only new fronds are curled | Usually normal croziers, unless growth has stalled or become damaged | Whether the fronds are firm, green and gradually unfurling |
| Heart fern leaves curling | Dry air, uneven moisture, direct sun, root damage or overwatering | Humidity, root-zone moisture, drainage and whether the broad blades are scorching or drying |
Underwatering
When the root zone becomes too dry, mature fronds may lose firmness and curl or shrink inward. The pot may feel unusually light, and the mix may pull away from the container wall. Fine-textured ferns such as maidenhair and Boston ferns can show visible stress quickly, but their needs still vary with pot size, temperature, airflow and growing medium.
Check moisture beneath the surface rather than assuming that a dry-looking top layer represents the entire root ball. If the mix is dry through much of the pot, water thoroughly so the root zone is evenly moistened and excess water exits through the drainage holes. Do not leave the container standing in drained water.
If water immediately runs down the sides without moistening the root ball, the mix may have become water-repellent. Apply water gradually in several passes. Future watering should be based on the condition of the mix, not a fixed weekly schedule. See how often to water a fern for a condition-based method.
Low Humidity
Dry indoor air can increase water loss from fern foliage. Common signs include curling margins, brown tips and a dry or papery texture, even when the root zone is not completely dry. The effect is often more noticeable near heating vents, air-conditioning outlets and other sources of moving air.
Humidity requirements differ among fern species. A Boston fern, maidenhair fern and leathery drought-tolerant fern should not automatically receive identical treatment. Use the known requirements of the species and, when needed, measure the room with a hygrometer.
A humidifier can provide a more measurable change than occasional misting. Grouping plants may modestly improve the immediate microclimate. A pebble tray must keep the base of the pot above the water, but its effect may be limited in a large or well-ventilated room. Misting should not be presented as a substitute for correcting chronically dry air.
Inconsistent Watering
Repeated cycles of severe drying followed by saturation can stress both roots and foliage. One watering may temporarily restore firmness, but recurring moisture swings can leave older fronds with permanent dry margins or distorted areas.
Check the plant often enough to learn how quickly its particular container dries, then adjust for seasonal light, temperature, airflow and active growth. The goal is not to water on the same day every week. It is to avoid both prolonged dryness and prolonged saturation according to the needs of that fern.
Sun and Heat Stress
Many tender indoor ferns perform best in filtered or indirect light, but light tolerance varies. Excessive direct sun can bleach or scorch fronds, while heat near a window can accelerate moisture loss. Curling may be concentrated on the exposed side of the plant and accompanied by pale, yellow-brown or crispy patches.
Move an affected fern away from intense direct light or filter the exposure with a sheer curtain. Avoid suddenly transferring a plant from a very dark position to strong light. The detailed guide to fern sunlight requirements explains how species, season and indoor placement affect light tolerance.
Do not assume that extra watering alone will solve heat or sun damage. Continually wetting the root zone while the foliage remains overheated may create a second problem.
Cold Drafts
Tender indoor ferns may react to cold windows, exterior doors, air-conditioning vents or rapid temperature changes. Affected fronds can droop, curl or develop discolored areas. Cold injury is more likely when the damage begins soon after a temperature event and is concentrated near the source.
Move the plant to a stable location appropriate for its species. Avoid placing foliage against cold glass. Tissue that has already been chilled, darkened or collapsed may not recover, although the plant can still produce healthy new fronds if the crown and roots remain viable.
Root-Bound or Damaged Roots
A root-bound fern may dry unusually fast because little usable potting mix remains around the roots. Water may run through the pot quickly, roots may circle densely around the root ball, or roots may emerge through the drainage holes. These signs are more useful than repotting simply because a certain number of months has passed.
Move the fern to a slightly larger container only after confirming that root crowding is affecting water management or growth. A much larger pot can retain excessive moisture around a relatively small root system. Follow the species-appropriate instructions in the fern repotting guide.
Root damage can also occur during repotting or division. If many fine roots were torn or removed, the remaining system may temporarily supply less water to the foliage. Keep conditions stable and avoid adding fertilizer immediately to an already stressed root zone.
Overwatering and Root Rot
Curling does not always mean that a fern needs more water. Roots require oxygen as well as moisture. A poorly drained or persistently saturated medium can damage roots and reduce their ability to transport water, producing wilting or curling above a wet root zone.
Warning signs include a pot that remains wet much longer than expected, yellowing lower fronds, declining new growth, an unpleasant odor or soft decaying roots. Fern roots are not all naturally white, so diagnose rot by loss of firmness and decaying tissue rather than color alone.
Check that the pot has open drainage holes and is not standing in water. If decline continues, carefully inspect the root system. Remove clearly decayed material with clean tools and replace collapsed, poorly aerated mix when necessary. Do not repeatedly add water merely because the fronds look wilted.
Fertilizer and Salt Buildup
Excess fertilizer or accumulated soluble salts can damage root tips and contribute to wilting, marginal browning and distorted foliage. A white crust on the potting mix or container may support the diagnosis, but its absence does not rule it out.
Pause fertilizer while the plant is stressed. If the roots are healthy and the container drains freely, the medium may be leached with clear water so excess drains from the bottom. Do not flush a waterlogged pot with suspected root rot. In severe cases, replacing the affected mix may be safer than repeatedly saturating it.
Pests
Inspect several fronds under bright light, including the undersides, rachis, petioles and crowded areas near the crown. Curling by itself is not enough to diagnose an insect or mite problem.
Spider mites
Spider mites may cause fine pale stippling, dull or bronzed foliage and, in heavier infestations, delicate webbing. They often become troublesome under warm, dry conditions. Their feeding can be mistaken for drought stress, so use magnification or tap a frond over white paper to look for moving specks.
Scale insects
Scale insects appear as fixed bumps on fronds or stalks. Some produce sticky honeydew. Heavy feeding can weaken growth and contribute to discoloration, distortion or decline. Be careful not to confuse normal fern structures, including sori on the undersides of fertile fronds, with insects.
Thrips
Thrips are not the first explanation for every curled fern, but greenhouse thrips are documented on ferns. Look for irregular silvery or scarred areas, tiny dark waste spots and distorted developing foliage. Confirm the pest before treatment because similar marks can result from mites or physical damage.
Isolate an infested plant and consult the fern pests and diseases guide. A strong but foliage-safe rinse may dislodge some pests. Any insecticidal soap, horticultural oil or other pesticide must be labeled for the pest, plant and place of use. Test a small section first because delicate fern foliage may react to sprays.
Heart Fern Leaves Curling
The heart fern, currently accepted by Kew as Hemionitis arifolia, is a small wet-tropical fern with broad, heart-shaped sterile fronds and narrower fertile fronds. Curling is particularly noticeable because its blades are simple and relatively broad rather than divided into many small leaflets.
Heart fern curled leaves are commonly associated with dry air or loss of moisture from the root zone. However, continually wet soil can damage the roots and create similar aboveground symptoms. Direct sunlight may scorch the blades, while spider mites and scale should also be considered when speckling, webbing or visible bumps accompany the curling.
Check a heart fern in this order:
- Confirm that the curled structure is not a new frond that is still unfurling.
- Check whether the medium is evenly moist, dry throughout or persistently soggy.
- Confirm that the container drains and the roots remain firm.
- Move the plant away from direct sun, hot glass and drying vents.
- Inspect both surfaces of the broad blades and the dark petioles for pests.
Do not use a universal humidity target for every fern, but recognize that heart fern is less tolerant of chronically dry air than many tougher houseplants. A humidifier or suitable enclosed growing environment may be more effective than repeatedly wetting the foliage. Avoid placing the plant in stagnant, saturated conditions.
Step-by-Step Diagnosis
Recovery Plan
The frond may improve
A green, flexible frond curled mainly from temporary loss of water pressure may regain some of its shape after moisture and environmental conditions are corrected.
The damage may remain
Scorched, chilled, torn, heavily pest-damaged or crispy tissue cannot repair itself. A frond may remain distorted even after the cause has been removed.
New growth may restore the plant
The most useful sign of recovery is healthy new growth. The plant’s overall appearance can improve as undamaged fronds develop and older damaged fronds are eventually removed.
Do not fertilize a severely stressed plant in an attempt to force recovery. Remove a frond when it is fully dead, diseased or so damaged that it is no longer contributing useful green tissue. Avoid cutting healthy croziers or green fronds solely because they have not immediately flattened.
There is no reliable recovery timetable that applies to every fern. Species, season, root health and the severity of injury all affect the outcome. For species-specific guidance, see the maidenhair fern care guide and Boston fern care guide.
How to Prevent Abnormal Curling
- Identify the fern whenever possible and follow care guidance for that species rather than treating all ferns alike.
- Check the root-zone moisture before watering instead of relying only on a calendar.
- Use a container with functioning drainage and do not allow it to remain in drained water.
- Provide the appropriate filtered light and protect tender indoor ferns from intense sun, hot glass and cold drafts.
- Avoid abrupt changes in location, light and temperature.
- Repot because the roots or medium require it, not automatically at a fixed interval.
- Apply fertilizer only at an appropriate strength and frequency for the species and its active growth.
- Inspect new plants and regularly examine leaf undersides for mites, scale and thrips.
Frequently Asked Questions
Can curled fern leaves uncurl?
Sometimes. A green frond that has curled because of a temporary water imbalance may regain part or all of its shape. Tissue that has become crispy, scorched, torn or heavily damaged by pests will not repair itself. Healthy new fronds may eventually replace the damaged appearance.
Why are my fern leaves curling inward even though the soil is wet?
Wet soil does not prove that the roots are supplying water effectively. Poor drainage, low oxygen, root damage or root rot can prevent normal uptake. Check drainage and root condition before adding more water.
Why did my fern curl after repotting?
Roots may have been disturbed, broken, planted into an unsuitable medium or surrounded by too much wet soil. A simultaneous change in light, temperature or humidity can add further stress. Keep conditions stable and correct only the problem supported by your inspection.
Should I cut off curled fern leaves?
Do not automatically remove a green frond that may still photosynthesize. Remove it when it is dead, diseased or extensively damaged. Always leave normal curled croziers intact so they can unfurl.
Does misting fix fern leaves that curl from low humidity?
Misting creates only a temporary change and may not meaningfully raise room humidity. A humidifier, a more suitable location or a species-appropriate enclosed environment offers more consistent control. Avoid keeping foliage continuously wet without adequate air movement.
Why are my heart fern leaves curling and turning brown?
Dry air, repeated drying of the root zone, direct sun and salt injury can curl and brown the margins. Persistently wet mix and damaged roots can also cause decline. Check the soil and roots before assuming that the plant simply needs more water.
References
- Royal Horticultural Society: Tender Ferns as Houseplants
- Royal Horticultural Society: How to Grow Ferns
- University of Maryland Extension: Watering Indoor Plants
- University of Maryland Extension: Fertilizer Toxicity and High Soluble Salts
- Penn State Extension: Repotting Houseplants
- University of Minnesota Extension: Managing Insects on Indoor Plants
- University of Minnesota Extension: Twospotted Spider Mites
- NC State Extension Plant Toolbox: Heart Fern
- Kew Science, Plants of the World Online: Hemionitis arifolia
- NC State Extension: Greenhouse Thrips
- University of California IPM: Houseplant Problems