
Repotting can give a crowded fern more root space or replace a potting mix that has become compacted, shrunken, or difficult to wet. It can also create unnecessary stress when it is done only because a few roots are visible or because the plant has recently been purchased. The safest approach is to examine the plant, its pot, and its growing medium before disturbing the root ball.
Quick Answer
Repot a fern when several signs indicate that the root system or potting mix is no longer functioning well. Choose a container with drainage holes that is only modestly larger than the existing pot, use a moisture-retentive but airy mix suited to the species, and keep the fern at its previous planting depth. Do not bury a crown, central growing point, or exposed creeping rhizome. Water thoroughly once, allow excess water to drain, and then return to species-appropriate watering rather than keeping the new mix continuously saturated.
Repotting, Potting Up, Refreshing, Dividing, and Transplanting
Repotting
Removing a plant from its container and placing it in a cleaned or new container, usually with fresh growing medium. The replacement pot may be the same size or larger.
Potting up
Moving a plant into the next reasonably larger container because its roots have substantially filled the existing pot.
Refreshing the mix
Replacing loose, degraded growing medium while keeping the fern in the same pot or a pot of similar size.
Root pruning
Removing part of a congested or damaged root system. It is an optional, species-dependent intervention, not a mandatory part of every repot.
Division
Separating a fern with multiple suitable crowns, rhizomes, or growing points into two or more independent plants. See the dedicated guide to dividing ferns.
Transplanting
Moving a plant from one growing position to another. The term may describe moving a garden fern, planting a nursery fern outdoors, or transferring a plant between containers.
When Does a Fern Need Repotting?
There is no dependable repotting interval for every fern. Growth rate, species, container size, pot material, watering, temperature, and the durability of the growing medium all affect how quickly conditions change. Inspect the plant instead of following a fixed two- or three-year schedule.
| What you observe | What it may mean | Recommended check |
|---|---|---|
| Many roots emerge from drainage holes | The root system may have filled most of the pot. | Slide out the root ball and check whether roots densely cover the outside. |
| Water passes through immediately | The mix may have shrunk away from the pot, become difficult to rewet, or contain too many roots. | Check whether water is moving through channels without moistening the center. |
| The mix is compacted, sunken, or crusted | Air spaces may have collapsed, or mineral salts may have accumulated. | Assess drainage, smell, texture, and whether the mix absorbs water evenly. |
| The pot becomes unusually light soon after watering | There may be too little usable growing medium around the roots. | Compare moisture in the center and edges rather than judging only the surface. |
| The pot cracks, tips, or no longer supports the plant | The plant may need a safer container even if it does not need substantially more root space. | Move it to a stable pot with drainage holes or use a weighted outer pot. |
| Growth has declined | Root congestion or degraded mix is possible, but light, watering, temperature, pests, and seasonal slowdown can cause the same symptom. | Rule out environmental and health problems before repotting. |
| The root ball is mostly roots with little mix remaining | Potting up, division, or controlled root pruning may be appropriate. | Choose according to the fern’s growth structure and the desired final size. |
Signs That Do Not Always Mean Repotting Is Needed
- One or two roots at a drainage hole: isolated roots can follow moisture or light without the entire root ball being crowded.
- A single yellow or brown frond: older fronds naturally decline. Check the pattern before blaming the pot.
- Temporary drooping: dry mix, heat, cold drafts, or a sudden location change may be responsible.
- Slow winter growth: indoor ferns often grow more slowly when days are shorter and rooms are cooler.
- Visible rabbit’s foot fern “feet”: exposed fuzzy rhizomes are a normal feature, not roots escaping because the plant is pot-bound.
- A full top canopy: abundant fronds do not prove that the root system has exhausted its space.
Use the guides to watering ferns, yellow fern leaves, and brown tips and browning fronds when the symptoms may have another cause.
When Should You Temporarily Avoid Repotting?
Delay nonessential repotting when the fern is severely dehydrated, heat-stressed, recently exposed to cold, producing especially fragile new fronds, or still adjusting to a major change in location. A newly purchased fern does not automatically need an immediate larger pot. First check drainage, root congestion, mix condition, pests, and whether the plant is stable in its new environment.
Repot promptly when delay presents a greater risk—for example, when the pot is broken, the mix remains chronically saturated, roots smell decayed, the container has no workable drainage, or the plant is in contaminated or severely degraded medium.
Best Time to Repot Ferns
For many indoor ferns, the beginning of active growth in spring or early summer is a practical time to repot. Increasing light and active root growth can help the plant establish in fresh medium. Avoid unnecessary disturbance during a cool, low-light period when the fern is using water slowly. However, serious drainage, decay, or container problems should be corrected when discovered rather than postponed until a preferred season.
Timing depends on the plant, not only the calendar. Tropical indoor ferns may continue growing in winter under warm temperatures and supplemental light, while outdoor or cool-grown ferns may have a clearly defined dormant or low-growth period.
Choosing the Right Pot
The new container should accommodate the existing root ball plus a modest amount of fresh mix. For many small and medium potted plants, moving up by approximately 1–2 inches in diameter is a useful starting point. Another general guideline is to avoid a container more than roughly one-third larger than the current pot. The correct increase also depends on the fern’s root structure and growth habit.
An oversized pot contains a large volume of mix that the existing roots do not yet occupy. That extra medium may remain wet longer, particularly in cool or low-light conditions. Wider, shallower containers may suit creeping-rhizome ferns better than deep pots, while a large Boston fern may need a heavier or wider-based container for stability.
Do Fern Pots Need Drainage Holes?
A standard potted fern should normally be grown in a container with one or more unobstructed drainage holes. Drainage holes allow excess irrigation water to leave the root zone and make thorough watering more manageable.
A decorative cachepot without holes can still be used if the fern remains in a separate nursery pot with drainage. Remove the inner pot for watering or empty all collected water from the outer container afterward. Do not allow the nursery pot to remain standing in drainage water.
Why Gravel Does Not Improve Pot Drainage
Placing gravel, pebbles, or a deep layer of broken pottery beneath fine potting mix does not create a substitute drainage system. Water tends to remain in the finer medium above the coarse layer until that medium becomes highly saturated. The coarse layer also reduces the depth of usable growing medium. Use a properly draining container and a suitable potting mix from the bottom of the pot upward instead.
A small piece of mesh may be placed over a large drainage opening to prevent mix from washing out, but it should not seal the hole or become a thick “drainage layer.”
Fern Pot Material Comparison
| Container type | Advantages | Points to watch |
|---|---|---|
| Plastic nursery pot | Lightweight, inexpensive, and slower to lose moisture through the sides. | Large top-heavy ferns may need a stable outer pot. Check that drainage holes are open. |
| Unglazed terra-cotta | Porous walls increase evaporation and may suit growers who tend to overwater. | The mix dries faster, so moisture-sensitive ferns may require closer monitoring. |
| Glazed ceramic | Less porous than unglazed clay and often heavier and more stable. | Confirm that the pot has a functional drainage hole; decorative ceramic pots often do not. |
| Hanging basket | Useful for Boston ferns and rabbit’s foot ferns with arching fronds or trailing rhizomes. | Air movement around the basket can increase drying. Ensure the hanger and ceiling support can carry the watered weight. |
| Decorative cachepot | Allows the fern to remain in a practical draining nursery pot while improving appearance. | Water can collect unseen in the bottom. Remove or empty it after watering. |
Choosing a Potting Mix
Most common potted ferns need a medium that holds useful moisture while maintaining air spaces and allowing surplus water to drain. A quality indoor potting mix may be suitable as a base. Depending on the species and the texture of the product, it may be amended with materials such as perlite, fine bark, coir, or another coarse component that resists compaction.
Avoid dense garden soil in an indoor pot. It may compact, drain poorly, and behave very differently in a container. Do not rely on one universal homemade ratio for Boston fern, maidenhair fern, rabbit’s foot fern, bird’s nest fern, and epiphytic species. Their structures and moisture requirements are not identical. See the broader guide to fern soil and fertilizer for additional context.
Tools and Materials
- A clean pot with unobstructed drainage holes
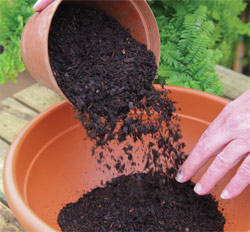
- Fresh, species-appropriate potting mix
- A clean work surface or repotting mat
- A watering can
- Clean scissors or pruners for genuinely dead or decayed roots
- A blunt label, narrow trowel, or clean knife for releasing a root ball stuck to a rigid pot
- Gloves if preferred
- A saucer or draining area
How to Repot a Fern Step by Step
Confirm that repotting is necessary
Check the drainage holes, stability of the pot, condition of the mix, watering behavior, and root density. Do not repot solely because the fern has one damaged frond.
Identify the fern’s growth structure
Locate its crown, central rosette, exposed rhizomes, or multiple growing points before removing it. This determines the correct planting depth and whether division is even possible.
Prepare the new container and mix
Clean a reused pot and confirm that water can pass through its drainage holes. Lightly moisten very dry potting mix so it is evenly workable, not muddy. Do not add a gravel layer.
Water according to the condition of the root ball
If the old mix is extremely dry and the fern is limp, rehydrate it before handling. A moderately moist root ball often holds together better than one that is either dusty dry or saturated and collapsing.
Release the fern without pulling its fronds
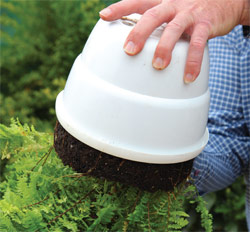
Support the base of the plant, tip the pot sideways or upside down, and tap or squeeze the container. For a rigid pot, carefully run a blunt tool around the inner edge. Cutting a disposable nursery pot is safer than forcefully tearing a delicate root system.
Inspect the root ball
Look at root texture, smell, and overall condition. Fern roots may naturally be tan, brown, or dark, so color alone does not diagnose rot. Healthy roots and rhizomes should generally feel intact rather than slimy, hollow, collapsing, or foul-smelling.
Loosen only what needs loosening
If fine roots are growing normally through the existing mix, minimal disturbance may be safest. Gently tease apart a tightly circling outer layer when needed. Do not automatically slash every root ball with a knife.
Remove only clearly dead or decayed material
Use a clean cutting tool for soft, collapsing, foul-smelling, or completely dead roots. Avoid aggressive root pruning simply to fit a healthy fern into an undersized pot. Root pruning is a controlled alternative for selected plants, not a universal requirement.
Set the correct planting depth
Add enough mix beneath the root ball to keep the fern at approximately its previous depth. Leave modest headspace below the rim for watering. Keep the crown or growing point uncovered. Position surface-growing rhizomes on top of the medium rather than burying them.
Backfill gently
Fill around the root ball and use your fingers to settle the mix into large gaps. Do not pound the medium with a stick or compress it into a dense mass. Watering will help settle loose particles around the roots.
Water and drain
Water evenly until excess begins to leave the drainage holes. Let the pot drain completely and empty the saucer or cachepot. If the mix settles significantly, add a small amount without covering the crown or rhizomes.
Return the fern to stable conditions
Place it in appropriate indirect light, away from abrupt heat, strong direct sun, cold drafts, or drying vents. Monitor moisture in the new mix rather than following the old watering schedule automatically.
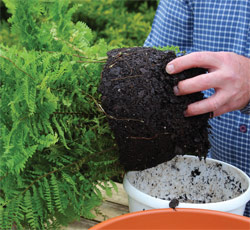
How to Inspect and Handle Fern Roots
Fern roots are often finer and more fibrous than the thick roots of many common foliage plants. Some species also have visible rhizomes, which are stems rather than roots. A dark root is not necessarily rotten. Evaluate whether it is firm and structurally intact. Decay is more strongly suggested by roots or rhizomes that are soft, slimy, hollow, easily sloughed, or accompanied by an unpleasant odor and chronically wet medium.
Root-bound plants do not all require identical treatment. A moderately dense root ball may need only a slightly larger pot. A severely congested outer layer can sometimes be loosened gently. Root pruning may be considered when the plant must remain in the same-size container, but removing a large part of the root system increases stress and should be avoided unless the species and plant condition make it appropriate.
Repotting Different Types of Ferns
| Growth type | Container approach | Critical planting detail |
|---|---|---|
| Ordinary clumping or crown-forming potted fern | Use the next suitable draining pot when roots have substantially filled the existing container. | Keep the crown and base of the fronds at their previous level. |
| Creeping-rhizome or “footed” fern | A wider or shallower pot may provide better horizontal growing room. | Keep exposed rhizomes on or above the surface; do not bury them as though they were roots. |
| Epiphytic fern | May require a basket, slab, board, moss support, or very open medium rather than a conventional deep pot. | Follow the species’ mounting and attachment requirements. Ordinary houseplant repotting instructions may not apply. |
Repotting a Boston Fern
Boston ferns commonly develop dense fibrous root systems and may form multiple crowns. Slide the plant out carefully, evaluate the root ball, and move it one practical pot size larger when necessary. A large specimen can be assessed for division, but repotting does not mean it must be divided. Keep the crowns at their previous depth and avoid packing the mix tightly. More species-specific information is available in the Boston fern care guide.
Repotting a Maidenhair Fern
Maidenhair ferns have delicate fronds and can react quickly when their root zone becomes too dry. Minimize unnecessary root disturbance and have the new pot ready before removing the plant. After repotting, maintain even species-appropriate moisture without leaving the pot waterlogged. Do not compensate for repotting stress with repeated fertilizer applications. See the maidenhair fern care guide.
Repotting a Rabbit’s Foot Fern
Rabbit’s foot fern and related Davallia species produce fuzzy creeping rhizomes that travel across the surface and over the pot rim. Position these rhizomes on top of the mix or along the edge of the container. Burying them can encourage deterioration. A wide, shallow, or hanging container may provide room for continued horizontal growth.
Repotting a Bird’s Nest Fern
Bird’s nest ferns sold as Asplenium nidus or related species produce fronds from a central rosette. Keep this central growing point above the potting mix. Do not fill the “nest” with medium, and direct irrigation around the root zone rather than leaving water trapped in the center. Use an airy, moisture-retentive mix that does not remain saturated.
Repotting Creeping-Rhizome Ferns
Examine which direction the active rhizome tips are growing. A broader container can provide space ahead of those tips. Set surface rhizomes at the same level they occupied previously. Rhizomes that naturally travel above the medium should not be forced underground.
Remounting a Staghorn Fern
Staghorn ferns are epiphytes and are often grown on wood, tree fern fiber, baskets, or another support with an open moisture-retentive material around the root area. Replacing a board or remounting an established specimen is not the same operation as potting up a Boston fern. Preserve the basal fronds and attachment area, use a secure non-copper fastening method, and follow species-appropriate mounting guidance. See the staghorn fern guide.
Repotting vs. Dividing a Fern
Repot the fern when:
- The plant needs more root space but should remain one specimen.
- The mix has broken down or no longer wets evenly.
- The pot is damaged, unstable, or unsuitable.
- The fern has only one crown or growth point that should not be cut apart.
Consider division when:
- The fern has multiple viable crowns, runners, or separable rhizome sections.
- The final plant is too large for the available space.
- The center has declined while healthy growth remains around the outside.
- Each proposed division can retain healthy roots and an active growing point.
Division is a form of fern propagation, not a mandatory stage of repotting. Bird’s nest ferns and other single-rosette ferns should not be cut through the sole central growing point. Consult the dedicated fern division guide before separating a plant.
Care After Repotting
- Water once thoroughly: moisten the new root zone and let all surplus water drain.
- Recheck moisture: a larger pot and fresh mix may dry at a different rate than the previous container.
- Use stable light: return the fern to suitable indirect light rather than combining repotting with a sudden move into strong sun.
- Avoid temperature extremes: keep the plant away from hot vents, cold drafts, and abrupt changes.
- Do not fertilize heavily: wait until the fern is stable and showing active growth. Fresh commercial mix may already contain fertilizer.
- Do not rely on frequent misting: misting is not required for every repotted fern and usually changes humidity only briefly. Stable room humidity and correct root-zone moisture matter more.
- Observe rather than repeatedly intervening: avoid moving, pruning, fertilizing, and watering again simply because a frond droops temporarily.
General indoor conditions and placement are covered in the indoor fern care guide.
Normal Short-Term Reactions vs. Serious Problems
Mild drooping, temporary interruption of growth, or loss of one or two older fronds can occur after root disturbance. These signs should remain limited rather than progressing rapidly. Repotting does not guarantee recovery when the original problem was root decay, pests, unsuitable light, temperature stress, or an incorrect identification.
| Post-repotting symptom | Possible explanation | What to check |
|---|---|---|
| Slight temporary drooping | Root disturbance, moisture adjustment, or a changed position | Confirm appropriate moisture, indirect light, drainage, and stable temperature. |
| Mix stays wet for an unusually long time | Oversized pot, compacted medium, low light, cool conditions, or blocked drainage | Check drainage holes and stop watering by calendar. Do not leave water in the cachepot. |
| Mix dries much faster than before | Porous pot, hanging position, coarse medium, exposed root ball, or warm moving air | Check moisture deeper in the pot and adjust watering without keeping it continuously saturated. |
| Rapid yellowing across many fronds | Excess water, severe root damage, crown burial, cold stress, or another preexisting problem | Inspect the planting depth, drainage, root-zone smell, and environmental change. |
| Brown or crispy tips develop | Root-zone drying, salt stress, excess fertilizer, damaged roots, heat, or dry air | Review watering, fertilizer, water quality, temperature, and humidity. |
| Soft or dark central growth point | Crown burial, trapped water, or decay | Remove mix from the crown, keep the center dry, and assess whether tissue is firm or collapsing. |
| Foul odor and collapsing roots | Root or rhizome decay | Remove saturated mix, trim only decayed tissue with clean tools, and correct drainage. |
| Plant remains loose in the pot | Large air gaps, insufficient root contact, or an oversized container | Gently settle mix around the root ball without heavily compressing it. |
Common Fern Repotting Mistakes
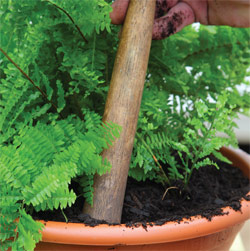
Do not forcefully compact the potting mix
This image shows a wooden handle being used to press the medium around a fern. A narrow tool may help guide loose mix into a large empty pocket, but it should not be used to pound or heavily compress the root zone. Settle the mix gently with your fingers and thorough watering so that useful air spaces remain.
- Repotting according to a fixed calendar instead of examining the plant
- Moving a small root ball into a much larger volume of wet mix
- Using a pot without drainage holes as the direct growing container
- Adding gravel or pebbles as a substitute for drainage
- Burying a fern crown, bird’s nest fern center, or surface-growing rhizome
- Pulling the plant by its fronds
- Aggressively tearing apart fine roots that were not severely congested
- Automatically scoring every circling root ball with a knife
- Tamping the mix into a dense mass with a stick or excessive pressure
- Fertilizing heavily immediately after root disturbance
- Watering repeatedly because mild temporary drooping is mistaken for dryness
- Treating repotting and division as the same procedure
- Applying ordinary potting instructions to mounted staghorn ferns
Frequently Asked Questions
Should I repot a fern immediately after buying it?
Not automatically. First confirm that the nursery pot drains, inspect for pests, observe how the mix absorbs water, and give the plant time to adjust to the new location. Repot immediately only when there is a clear problem such as severe root congestion, damaged containers, persistent saturation, contaminated mix, or absent drainage.
How much bigger should the new fern pot be?
For many small and medium ferns, use the next practical pot size, often about 1–2 inches wider. Consider the root ball rather than the frond spread alone. Creeping-rhizome ferns may benefit more from additional width than depth.
Do I need to loosen the roots?
Only when the outer roots are densely circling or the old mix prevents contact with the fresh medium. Fine fern roots can be damaged by aggressive teasing. A root ball with normally distributed roots may need little disturbance.
Should I cut all brown fern roots?
No. Root color varies by species, age, and growing medium. Firm brown or dark roots may be healthy. Remove tissue that is clearly soft, slimy, hollow, collapsing, or foul-smelling rather than judging by color alone.
Can I repot a fern in winter?
Essential corrective repotting can be done when necessary. For routine potting up, active growth is generally preferable because cool, low-light conditions can cause fresh medium to remain wet longer. A tropical fern under warm temperatures and strong supplemental light may not follow the same seasonal pattern.
Should I mist a fern after repotting?
Misting is not a universal requirement and does not correct an unsuitable root zone. Maintain the normal humidity appropriate for the species, keep the fern away from drying vents, and manage moisture in the potting mix carefully.
Can repotting save a fern with root rot?
Replacing saturated medium and removing clearly decayed tissue may help when viable roots or rhizomes remain, but recovery cannot be guaranteed. The drainage, watering pattern, planting depth, temperature, and original cause must also be corrected.
Does a Boston fern have to be divided when it is repotted?
No. A Boston fern can be moved intact into the next suitable pot. Division is optional and should be considered only when the plant has multiple viable crowns and reducing its size or producing separate plants is desirable.
Should rabbit’s foot fern rhizomes be covered with soil?
No. The fuzzy rhizomes normally creep across the surface and over the pot edge. Position them on or just above the growing medium so that roots can enter the mix without burying the rhizome itself.
References
- University of Maryland Extension. “Potting and Repotting Indoor Plants.” University of Maryland Extension
- North Carolina Cooperative Extension. “Repotting Houseplants.” NC State Extension
- University of Georgia Cooperative Extension. “Growing Ferns.” University of Georgia Extension
- Royal Horticultural Society. “How to Repot a Plant.” Royal Horticultural Society
- Penn State Extension. “Repotting Houseplants.” Penn State Extension
- Clemson Cooperative Extension. “Rabbit’s Foot Fern.” Clemson Cooperative Extension
- NC State Extension Plant Toolbox. “Davallia fejeensis.” NC State Extension Plant Toolbox
- Missouri Botanical Garden. “Asplenium nidus.” Missouri Botanical Garden
- Clemson Cooperative Extension. “How to Grow and Care for Bird’s Nest Fern.” Clemson Cooperative Extension
- University of Florida IFAS Extension. “Staghorn Fern.” University of Florida IFAS Extension
- Iowa State University Extension and Outreach. “How to Care for Houseplants.” Iowa State University Extension
- University of Connecticut Home & Garden Education Center. “Ferns: Indoor Growing.” University of Connecticut Extension