
Quick Answer
To grow ferns from spores, collect a fertile frond shortly before its mature sporangia release their spores. Let the frond dry in a labeled paper envelope, separate the fine spore dust from larger debris and sow it thinly on the surface of clean, moist, low-nutrient compost. Do not bury the spores.
Seal the container to retain humidity and place it in bright, indirect light at a temperature suitable for the species. The spores first produce small gametophytes, not miniature fern fronds. After fertilization occurs in a film of water, young sporophytes—the recognizable fern generation—begin to develop.
Is Growing Ferns from Spores Difficult?
The individual steps are not technically difficult, but fern spore propagation requires cleanliness, accurate observation and patience. The most common problems are collecting immature or already-dispersed spores, sowing too thickly, introducing contaminants and transplanting before young sporophytes are established.
Why beginners can succeed
Many commonly cultivated terrestrial ferns will germinate on a simple, moist growing medium under indirect light. Expensive laboratory equipment is not normally required. A transparent covered container, suitable compost and careful handling may be enough.
Why results vary
Fern species do not all respond to the same temperature, light level, storage method or timetable. Some spores remain viable in storage, while others lose viability comparatively quickly. Specialized aquatic, epiphytic or fungal-dependent species may need methods beyond this beginner guide.
Sori vs. Sporangia vs. Spores
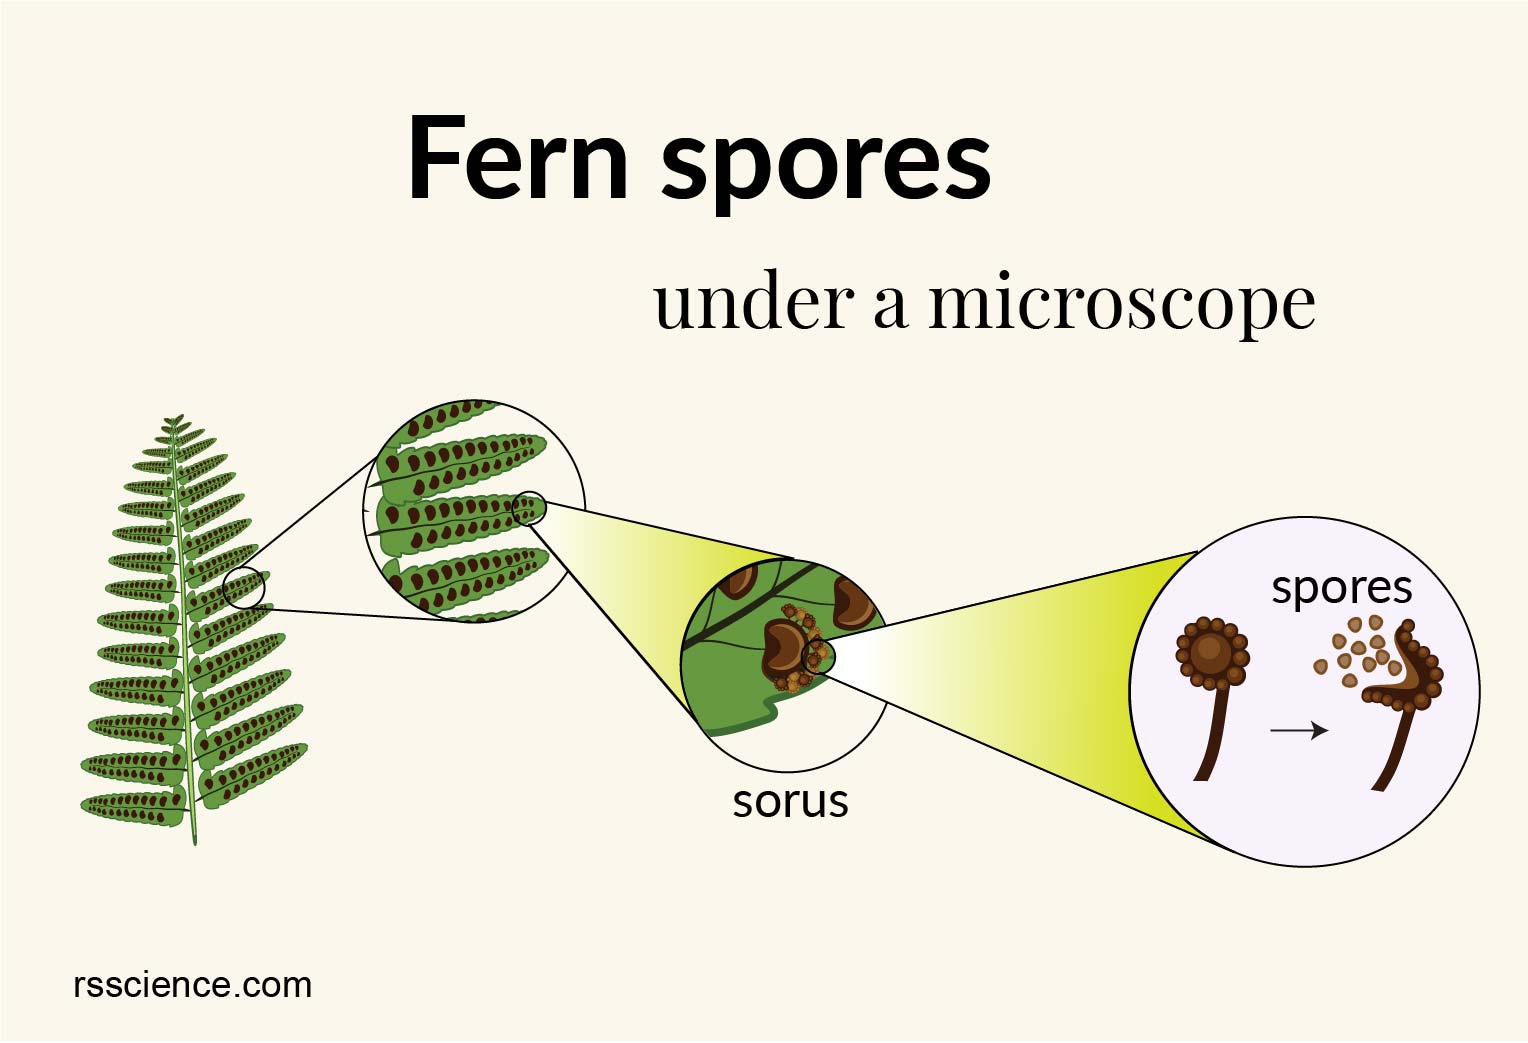
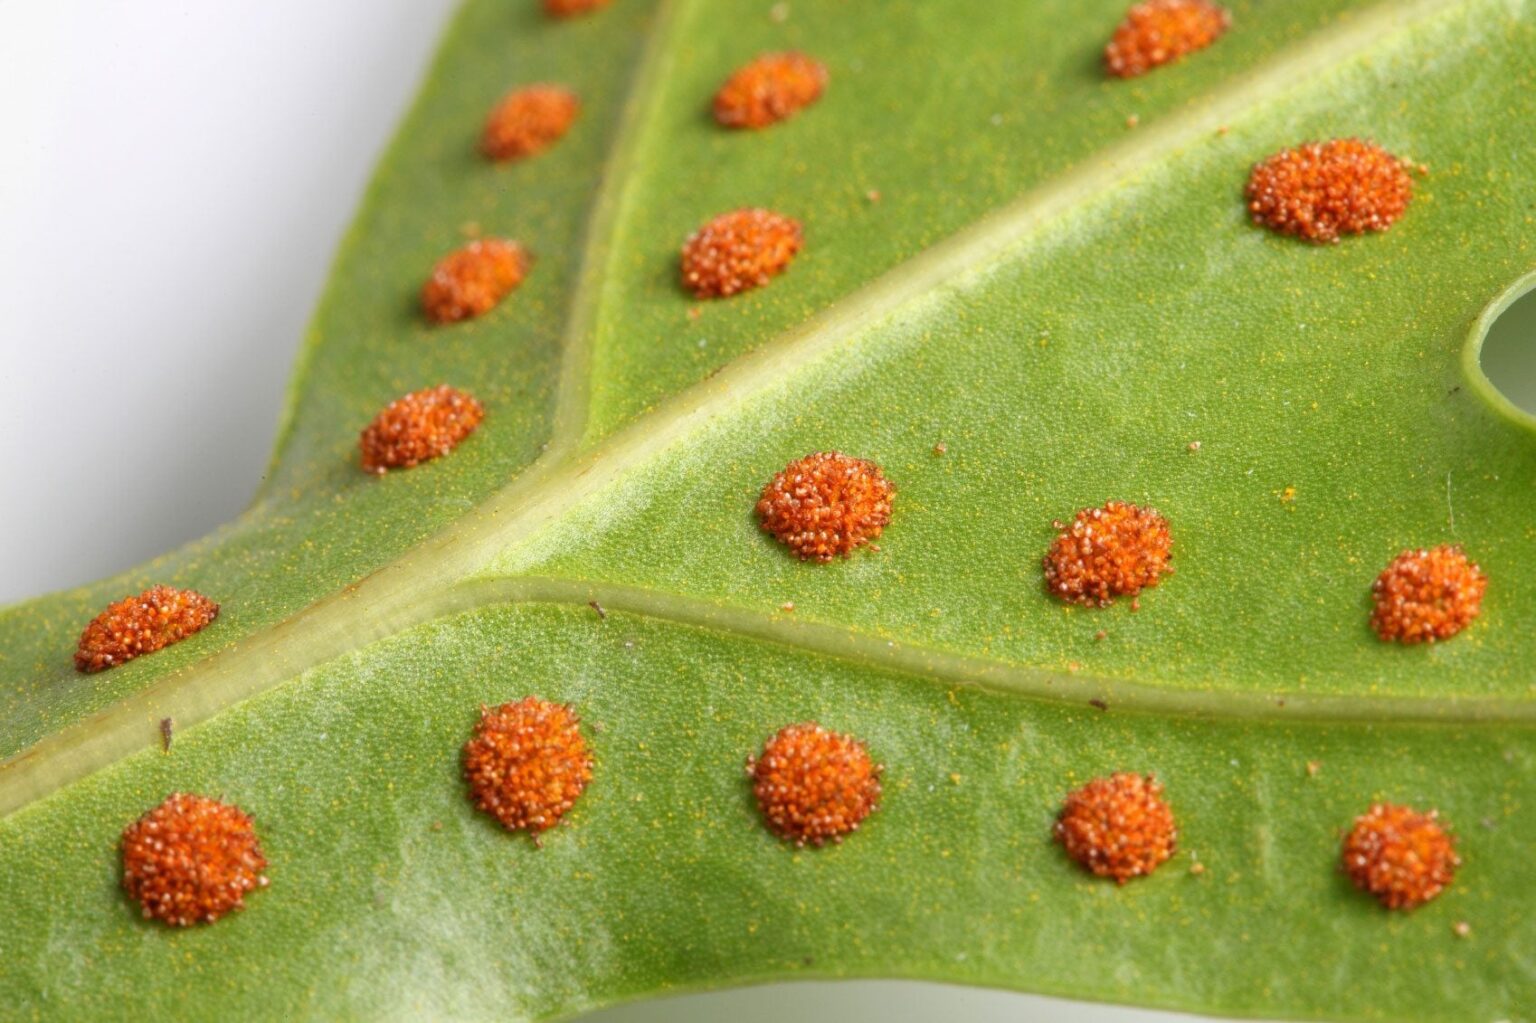
The brown, orange, yellow or black structures visible on a fertile frond are not necessarily loose spores. Several different structures are involved, and distinguishing them helps you collect at the correct stage.
| Term | What it is | What you may see | Role |
|---|---|---|---|
| Sorus Plural: sori | A cluster or group of sporangia. | Dots, lines, patches or bands, usually on the underside or margins of fertile fronds. | Groups the spore-producing structures in a species-specific pattern. |
| Sporangium Plural: sporangia | A small capsule in which spores develop. | Usually too small to distinguish clearly without magnification; mature capsules often darken and open. | Produces and releases spores. |
| Spore | A microscopic, usually single-celled reproductive unit produced by the sporophyte. | Fine yellow, tan, brown or dark powder after release. | Germinates into the gametophyte generation. It is not a seed and contains no multicellular embryo. |
| Indusium Plural: indusia | A flap or membrane covering the developing sorus in some ferns. | A pale, green, brown or papery cover over the sori. | Protects developing sporangia. Many fern species lack a true indusium. |
| Gametophyte Also called a prothallus | The small, haploid, gamete-producing generation that grows from a spore. | Often a thin, green, flat or heart-shaped structure only a few millimeters wide, although form varies. | Produces the reproductive organs involved in fertilization. |
| Sporophyte | The diploid fern generation that develops after fertilization. | First a tiny leaf and root, then increasingly recognizable fern fronds. | Grows into the familiar fern plant and eventually produces sporangia and spores. |

How to Identify Mature Spores
The best collection moment is after the spores have matured but before most of them have dispersed. There is no single calendar date that applies to all ferns. Season, species, local climate, frond age and growing conditions influence maturation.
| Observation | Likely stage | Collect now? |
|---|---|---|
| Sori are pale green, soft or only beginning to form. | Immature sporangia are still developing. | No. Recheck the frond later. |
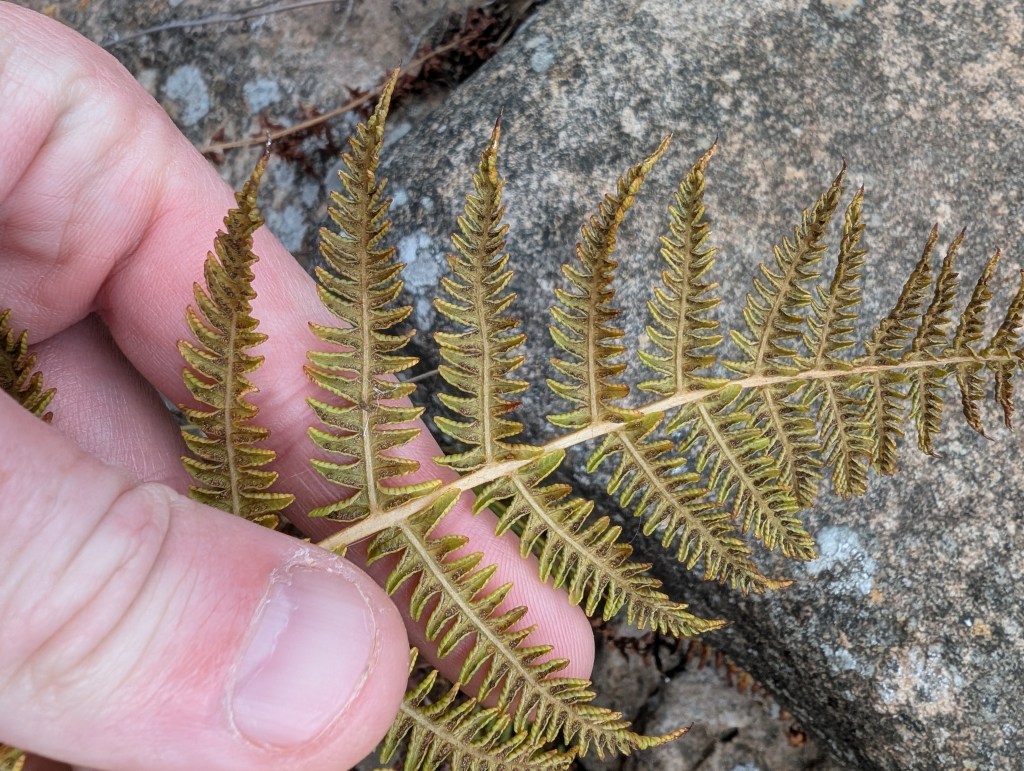
| Sori have developed their characteristic mature color; sporangia look full; an indusium, when present, may begin lifting at the edge. | Approaching maturity. | Possibly. Test a small frond segment in a paper envelope. |
| A clean dusting of fine powder falls onto paper after the frond is kept dry for a day or two. | Mature spores are being released. | Yes. This is generally the useful collection window. |
| Sori look dry, collapsed or empty, and little fine powder falls. | Many spores may already have dispersed. | Usually too late, although a small quantity may remain. |
| Only coarse flakes, hairs or fragments fall from the frond. | Mostly chaff or frond debris rather than a useful spore deposit. | Do not assume the material contains viable spores. |
A hand lens can help you see whether the sporangia appear full, opening or largely empty. Because sori differ among taxa, compare the frond with reliable information for the identified species whenever possible.
When and How to Collect Fern Spores
When to collect
Check fertile fronds repeatedly as they mature. For some temperate ferns this occurs during summer or autumn, but other species release spores in different seasons. Collect according to the condition of the frond, not a universal month.
How to collect spores without excess debris
- Select a healthy fertile frond or a small fertile section that appears close to releasing spores.
- Make sure you have permission to collect. Do not remove material from rare, protected or wild populations where collection is prohibited.
- Place the frond in a clean, dry paper envelope. Use a separate envelope for every species and parent plant.
- Label it immediately with the plant name, collection date and source.
- Keep the envelope in a dry, draft-free place for approximately one or two days.
- Remove the frond carefully. Fine powder left behind may include spores, while larger flakes are usually sporangial or frond debris.
- Transfer the finest material onto a clean sheet of smooth paper. Gently tapping and tilting the paper can help separate heavier fragments without using chemicals.
Equipment and Materials
Basic equipment
- Clean paper envelopes
- White and optionally dark smooth paper
- Waterproof labels and marker
- Clean spoon or small scoop
- Transparent lidded containers or small pots with clear covers
- Fine, low-nutrient seed compost
- Washed horticultural sharp sand or fine grit if required by the mix
- Clean water suitable for the plants
- Hand lens, optional but useful
Avoid using
- Old garden soil containing weed, moss and fungal propagules
- Previously used compost
- Rich compost with heavy fertilizer additions
- Containers that cannot be closed or covered
- Unlabeled packets or mixed collections
- Household fungicides or improvised chemical sterilants
- Microwave or oven procedures without a validated protocol
Clean-operation checklist
- Work on a cleared, freshly cleaned surface.
- Wash and dry your hands before handling spores.
- Use new or thoroughly washed containers.
- Use fresh growing medium, not reused compost.
- Keep each fern collection in a separate envelope.
- Label the container before sowing.
- Turn off fans and close windows while handling spores.
- Open the container for the shortest practical time.
- Do not work immediately after handling outdoor soil or compost.
- Keep unsown packets closed and away from the work area.
Complete Step-by-Step Method
Confirm the fern and fertile frond
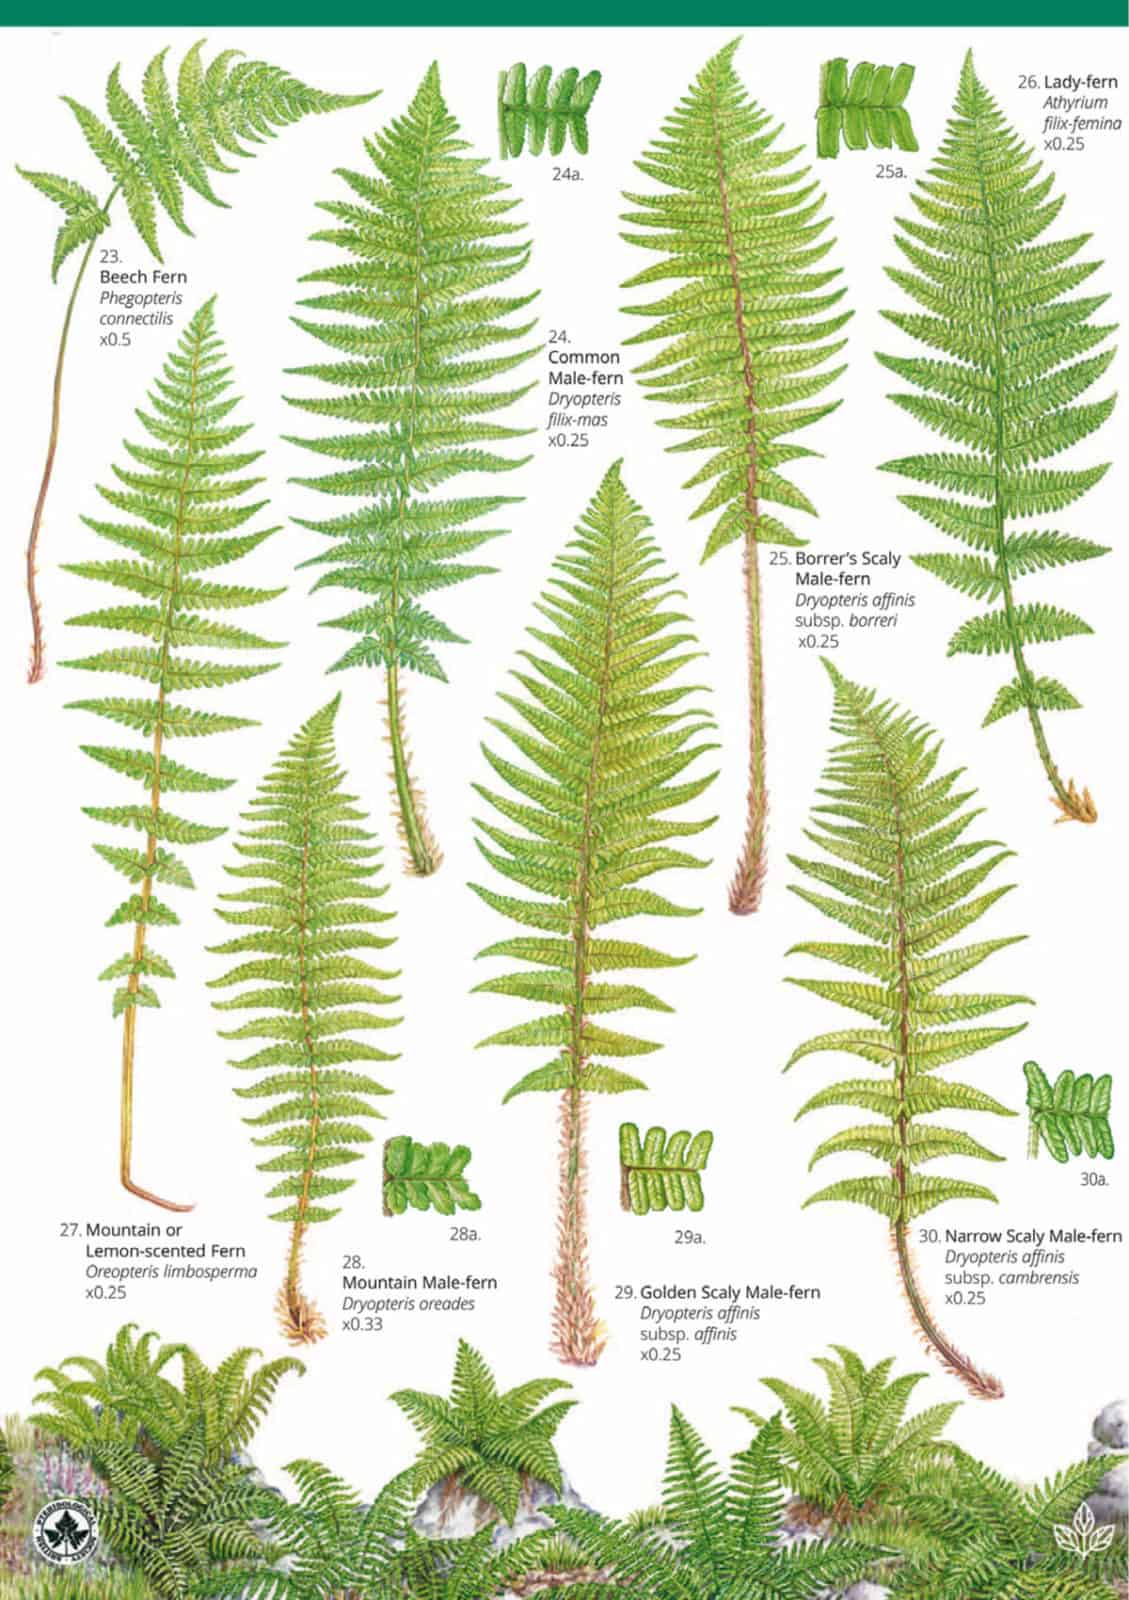
Identify the parent fern as accurately as possible. Check that the frond bears genuine sori or other recognized fertile structures. Do not collect solely because the underside is brown or spotted.
Collect and label the frond
Place a small fertile frond section in a dry paper envelope. Record the scientific name when known, collection date, location or parent plant and any uncertainty about identification.
Allow mature spores to fall
Leave the envelope in a warm, dry but not hot location for about one or two days. Remove the frond carefully. A fine powder may remain with pieces of sporangia, indusia, hairs or scales.
Separate the finest material
Place the deposit on smooth paper. Tap and tilt gently so that large fragments move separately from the finer dust. Complete purity is not realistic in a home setting, but removing obvious chaff reduces contamination and overcrowding.
Prepare a clean container
Wash the container and lid with hot water and ordinary dish soap, rinse thoroughly and allow them to dry. A container with a transparent lid makes it possible to retain humidity while observing the culture without opening it.
Prepare the growing medium
Use a fine, low-nutrient seed compost or a fine peat-free mix amended with washed horticultural sharp sand where better drainage is needed. Firm the surface lightly and moisten it evenly. It should be damp throughout but not flooded.
Optionally reduce surface contamination
The RHS describes covering the compost surface with newspaper and carefully pouring boiling water through it until hot water drains from the base. If using this method, work in a sink, use only heat-resistant pots and trays, keep hands and face clear of steam and splashes, and never pour boiling water into a sealed or thin plastic container. Cover the treated compost and allow it to cool completely before sowing.
This treatment can reduce unwanted fungal, moss and fern spores, but it does not create laboratory sterility.
Sow the spores very thinly
Use a folded sheet of paper to distribute a barely visible dusting across the surface. Do not bury the spores, mix them into the compost or sow a thick brown layer. Dense sowing increases competition and makes contamination harder to manage.
Seal and label immediately
Fit the transparent lid or cover as soon as sowing is complete. Add the fern name, source and sowing date. When sowing several taxa, handle one packet at a time and clean the work area between batches because spores drift easily.
Provide indirect light and stable moisture
Place the culture in bright, filtered or indirect light. Avoid direct sun, which can rapidly overheat a sealed container. Keep the medium consistently moist but not submerged. A sealed culture normally needs little additional water.
Watch for gametophytes
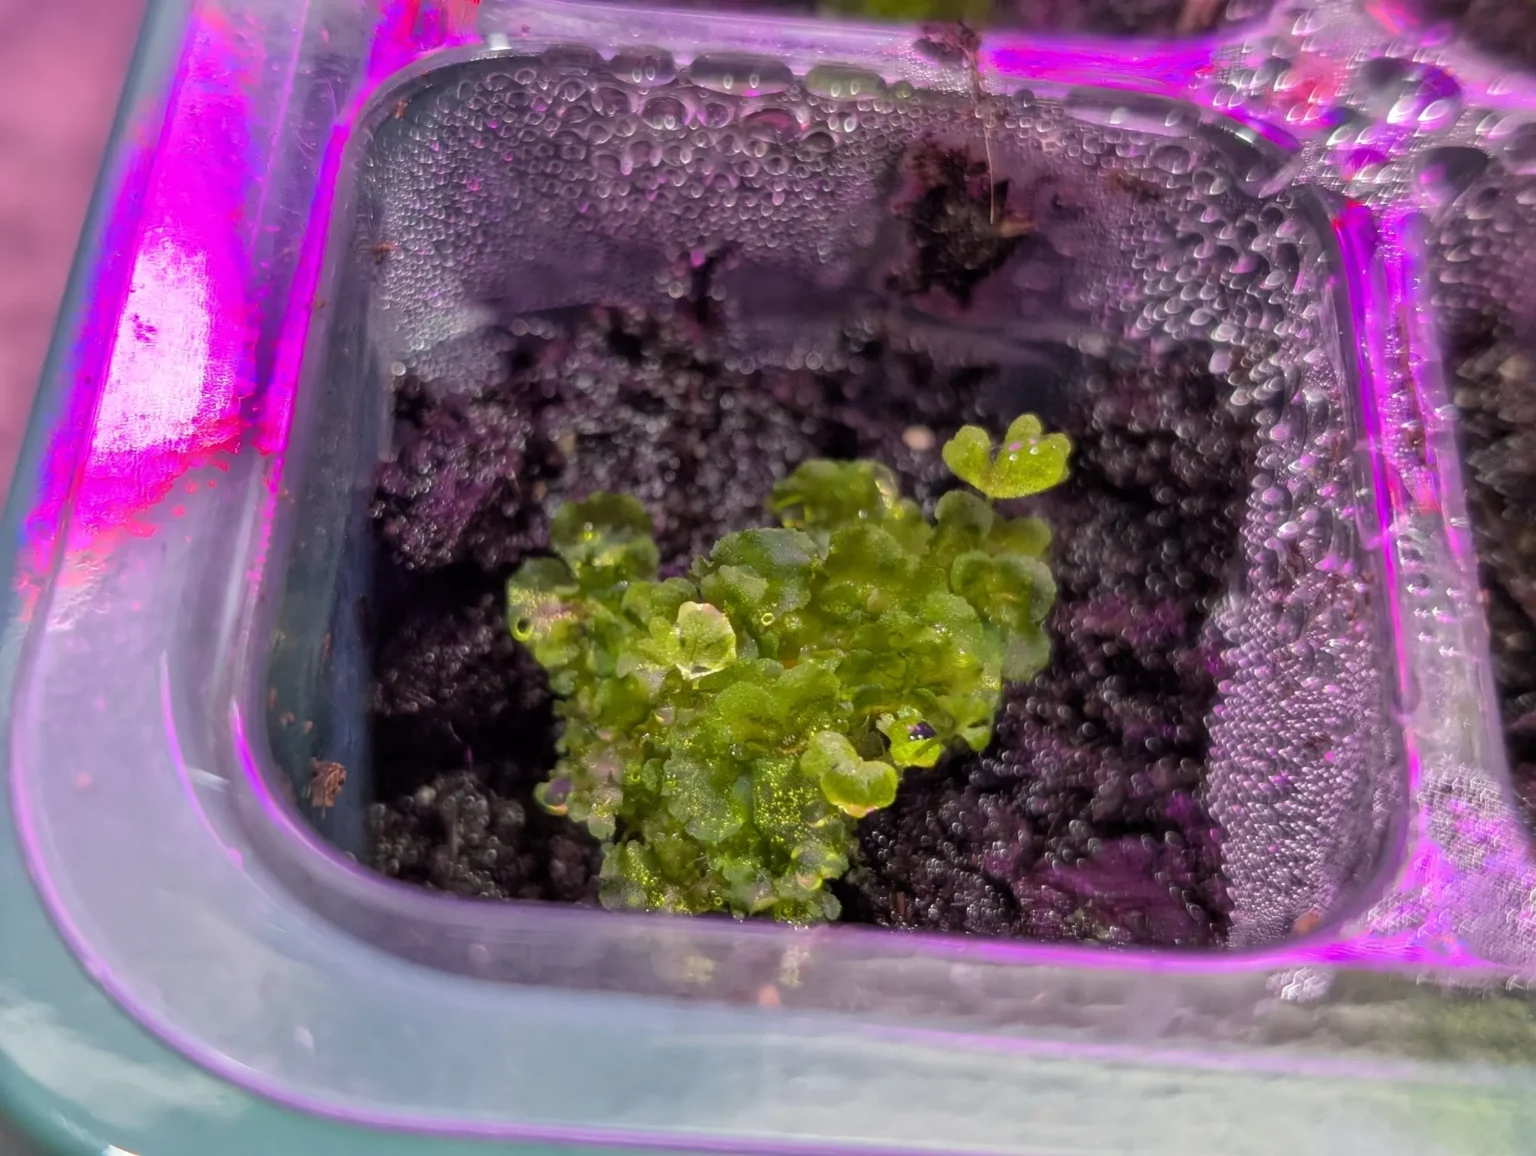
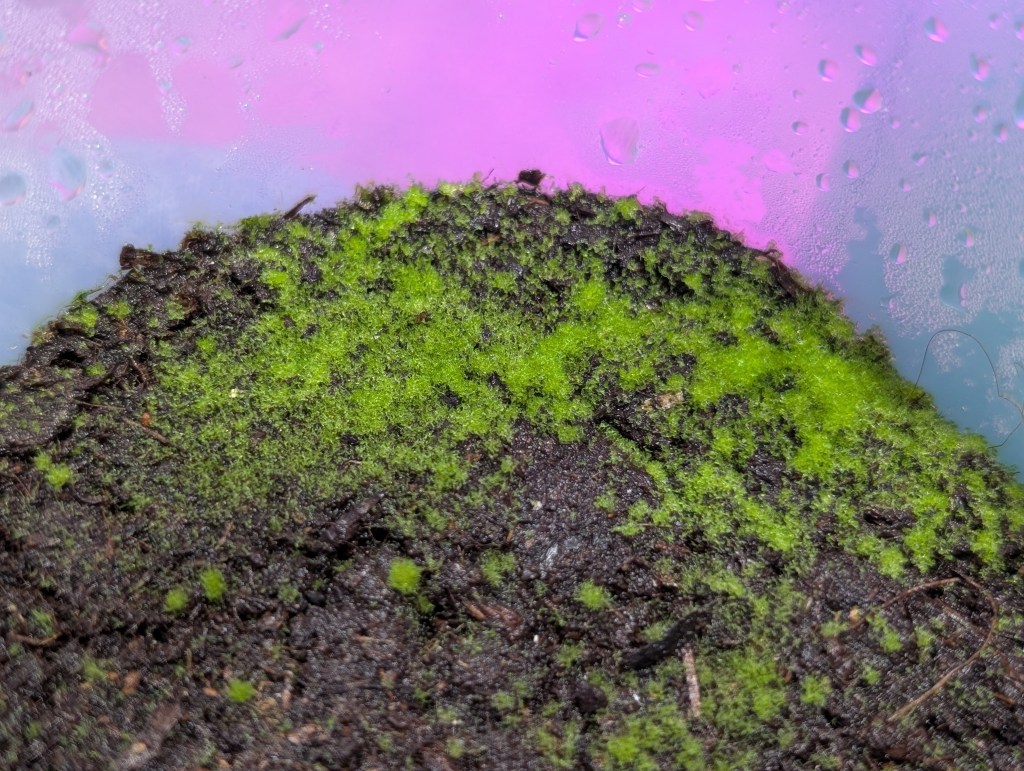
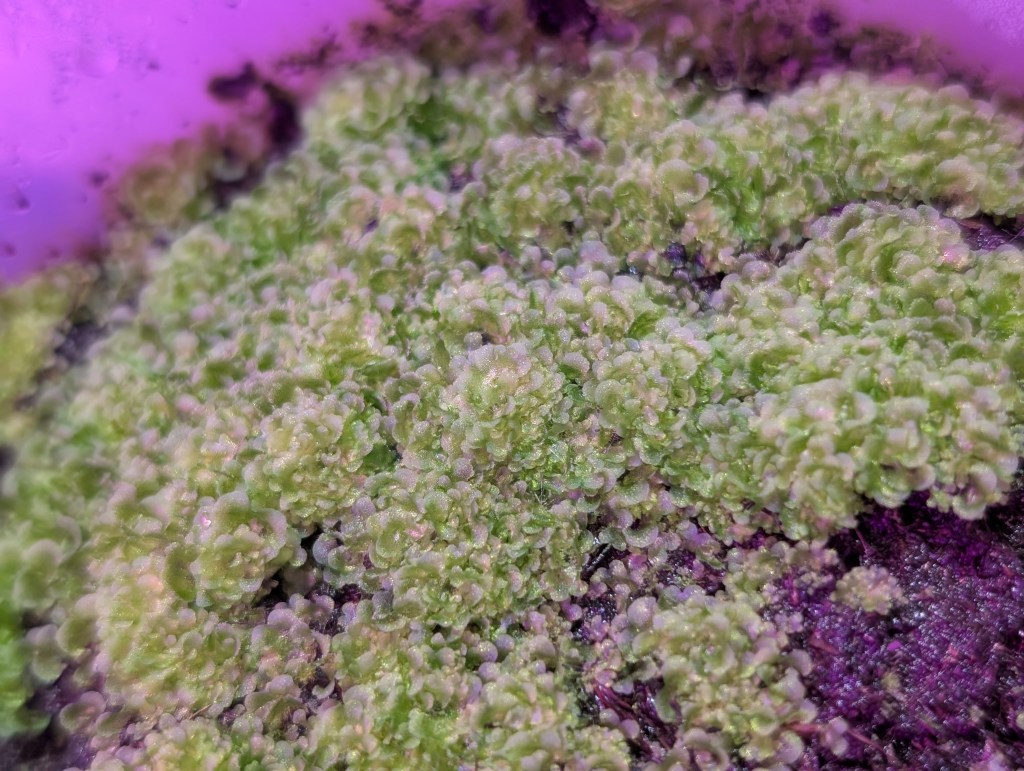
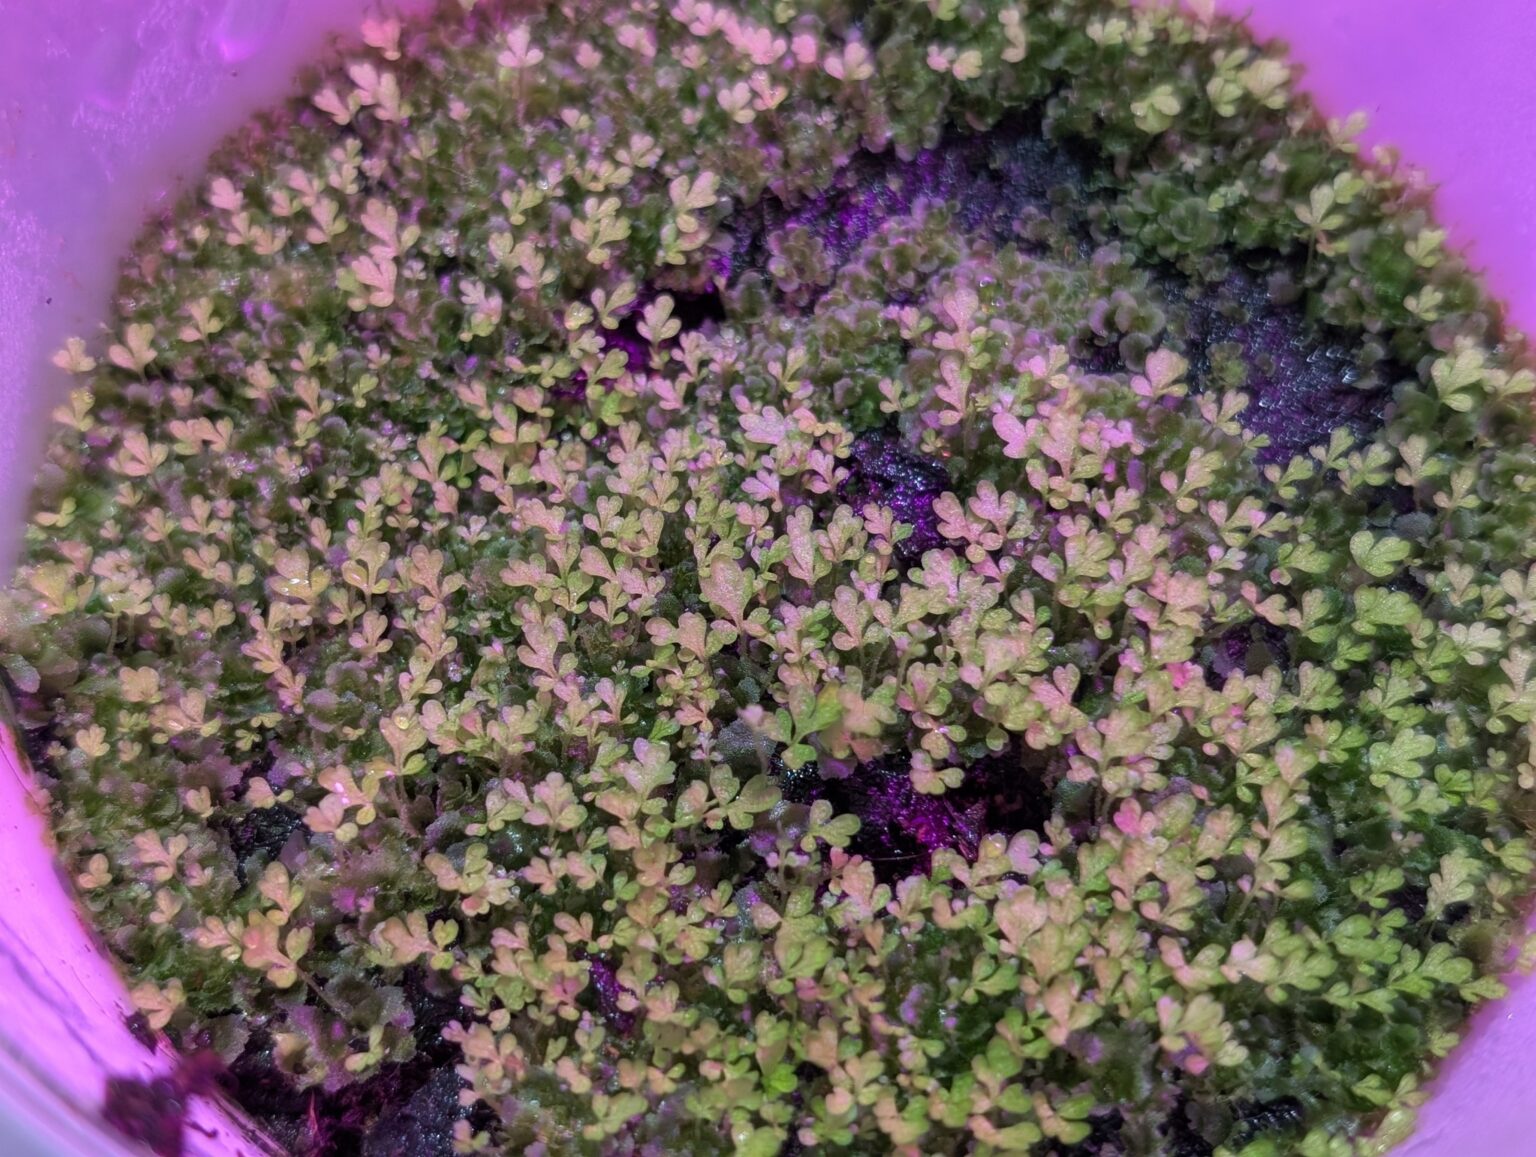
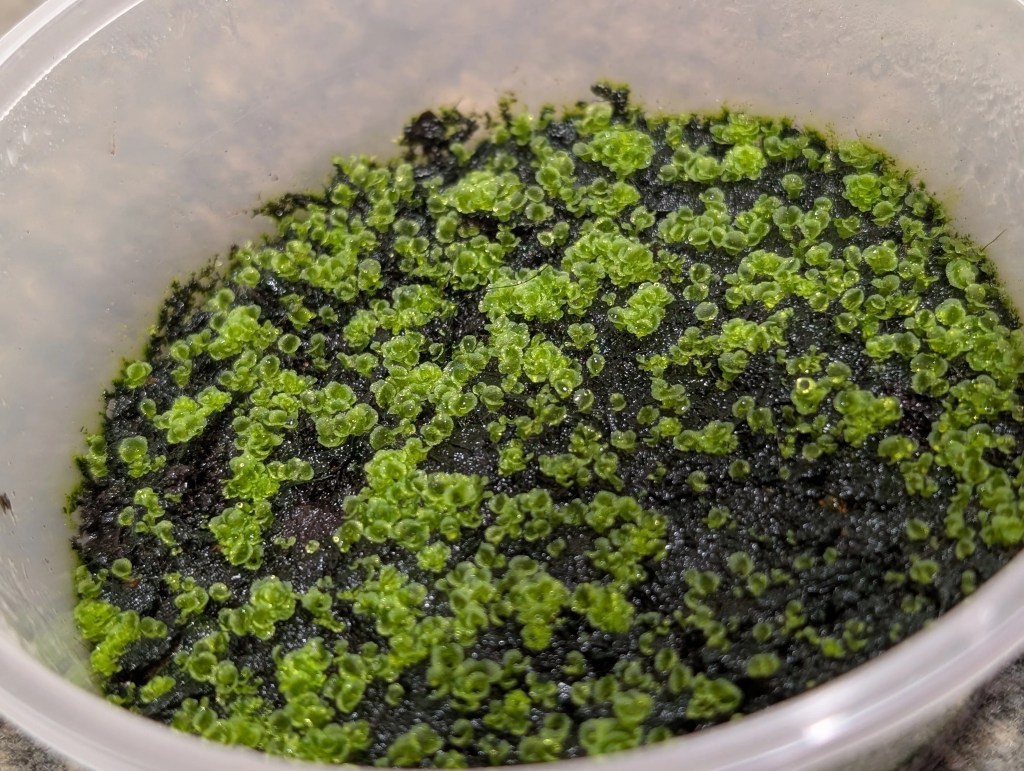
Early growth may first appear as fine green threads or a thin green film. With time, separate flat gametophytes should become more apparent. These structures are not ordinary juvenile fern leaves.
Wait for young sporophytes before transplanting
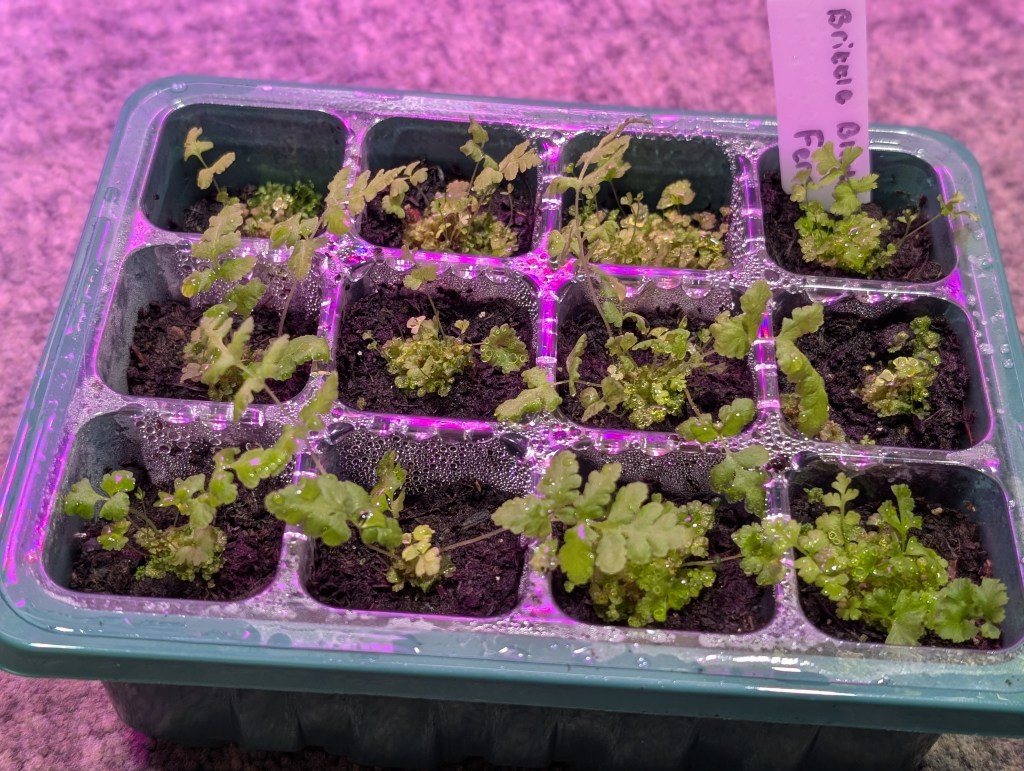
After fertilization, tiny leaves belonging to the new sporophyte generation emerge among the gametophytes. Wait until young plants have two or three small fronds and can be moved in small clumps without immediately collapsing.
Light, Temperature and Moisture
Light
Bright indirect light is a practical starting point for many cultivated ferns. Several experimental studies have found that spores of the tested homosporous ferns required light to germinate, but the response depended on species, light quality and intensity. Do not place sealed containers in harsh direct sunlight.
Temperature
A room temperature near 18–22°C or 64–72°F is often used for commonly cultivated species, and the Australian National Botanic Gardens describes approximately 20°C as a general propagation condition. This is not a universal optimum. Research across multiple species has found different responses across temperature gradients, including inhibited germination at temperatures that were too low or too high.
Moisture
The medium must remain moist enough for germination and gametophyte development, but standing water can encourage algae, bacteria and decay. Condensation on the lid shows that water is cycling inside the container; it does not by itself prove that the culture has the ideal moisture level.
What Happens After Germination?
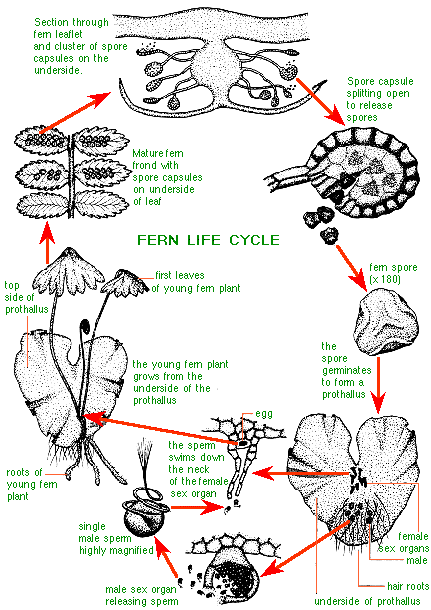
Fern propagation from spores includes two separate free-living generations. The spore does not immediately become the leafy fern that you recognize. It first produces the gametophyte generation. Fertilization then gives rise to the young sporophyte.
| Stage | What is happening | What the grower may see | Main requirement |
|---|---|---|---|
| Spore | The haploid spore absorbs water and begins germination under suitable conditions. | Usually nothing visible without magnification at first. | Moist surface, suitable temperature and appropriate light. |
| Gametophyte | The spore develops through an early filamentous stage into a small photosynthetic gametophyte in many common ferns. | Green threads, a film and later separate flat green structures. | Continued moisture, indirect light and low contamination. |
| Fertilization | Motile sperm move through a film of water to reach an egg in the archegonium. | No obvious visible event; mature gametophytes may remain unchanged for a period. | A thin film of water without prolonged waterlogging. |
| Young sporophyte | The fertilized egg develops into the diploid generation. | A tiny upright leaf and root emerging from or beside a gametophyte. | High humidity, light and minimal disturbance. |
| Transplanting | Established young sporophytes are moved into fresh compost. | Several small fronds and developing roots. | Gentle handling and gradual humidity reduction. |
The gametophyte stage
In many familiar ferns, a mature gametophyte is a small, thin, green structure that may become heart-shaped. It has rhizoids rather than the true roots of the sporophyte. Not every fern produces the textbook heart shape, so use this description as a common pattern rather than an absolute identification rule.
Fertilization and the role of water
The reproductive organs develop on the gametophytes. The sperm require a continuous film of water to reach an egg. A properly humid culture may provide sufficient moisture naturally. If mature gametophytes remain healthy but no sporophytes appear, a very light application of clean water may help create a temporary surface film. Do not flood the container.
When young sporophytes appear
The first sporophyte leaf may be simple and may not resemble the divided fronds of the adult fern. Later leaves gradually develop more characteristic features. The original gametophyte may remain visible for a time before declining.
When and How to Transplant Young Ferns
Transplant when identifiable sporophytes have two or three small fronds and enough root development to remain together when lifted. Moving isolated gametophytes too early can interrupt development and expose them to drying.
- Prepare small pots or cells with fresh, fine, moist potting compost appropriate for the species.
- Use a clean label or small tool to lift a small clump containing several young sporophytes.
- Set the clump at approximately the same depth at which it was growing.
- Water gently without washing the plants out of the compost.
- Return the pots to a covered, humid environment in indirect light.
- Once new growth is evident, begin opening the cover gradually over several days or longer.
- Separate individual plants later, after they are larger and better rooted.
Preventing Mold, Algae and Contamination
Fern spores, fungal spores, moss spores and microscopic algae can all enter a culture through compost, containers, water, hands, tools or moving air. Prevention is more reliable than trying to treat a contaminated culture later.
- Use fresh growing medium and clean containers.
- Sow thinly and close the lid promptly.
- Do not repeatedly open the culture to inspect or mist it.
- Avoid overrich compost and unnecessary fertilizer.
- Keep direct sun from heating the sealed container.
- Keep separate spore batches physically separated while sowing.
- Discard badly contaminated cultures rather than applying unverified household chemicals.
Mold vs. gametophyte: preliminary identification
| Feature | Likely fern gametophyte | Likely mold or other contamination |
|---|---|---|
| Color | Usually clear green to medium green when photosynthetic. | Often white, gray, black, tan or colored; some algae are also green. |
| Texture | Thin, smooth, flat or plate-like and closely attached to the medium. | Fuzzy, cottony, web-like, powdery or raised above the surface. |
| Development | May begin as threads or a green film, then form more distinct flat structures. | May spread rapidly in irregular circles or bridge gaps with visible filaments. |
| Effect on culture | Gradually produces organized gametophytes and eventually sporophytes. | May cover, discolor or collapse the culture; algae can form a slick layer that competes for space. |
This comparison is only a visual screening guide. Very early gametophyte growth can be difficult to distinguish from algae without magnification. When growth is fuzzy, rapidly spreading or accompanied by decay, isolate the container from other cultures.
Common Reasons Fern Spores Do Not Germinate
| Problem | Likely cause | What to do next |
|---|---|---|
| No growth after an extended period | Immature spores, empty sporangia, old or nonviable spores, unsuitable temperature or insufficient light. | Continue observing if conditions are stable, verify the species requirements and start a second culture with freshly collected spores. |
| Only large brown flakes were collected | The material may be mostly sporangial debris, indusia or frond scales. | Collect another frond and confirm that fine powder is released onto paper. |
| A dense green coating forms | Over-sowing, algae or closely packed gametophytes. | Examine with a hand lens. Improve cleanliness in future cultures and sow much more thinly. |
| White or gray fuzz spreads | Fungal contamination favored by contaminated material, excess organic debris or stagnant saturated conditions. | Isolate the container. If the growth is spreading, discard the culture and restart rather than spraying household fungicides. |
| Healthy gametophytes but no sporophytes | Gametophytes may be immature, too crowded, too dry for fertilization or subject to species-specific reproductive behavior. | Allow more time, maintain humidity and provide a brief thin film of clean water without flooding. |
| Young plants collapse after transplanting | Transplanted too early, damaged roots, dry air, direct sun or abrupt humidity reduction. | Move larger clumps, cover immediately and acclimate the young plants gradually. |
| Unexpected fern species appear | Airborne spores, mixed packets, contaminated fronds or incorrect labeling. | Keep batches separate and treat the identity as provisional until the sporophytes can be examined. |
| Surface becomes waterlogged or sour-smelling | Excess water, poor drainage or microbial activity. | Do not add more water. If decay progresses, restart with a free-draining medium and less initial moisture. |
Realistic Timeline and Variation
There is no guaranteed timetable from spore to mature fern. Under favorable conditions, some spores may begin germinating within several weeks, while others take months or fail completely. The visible gametophyte stage may persist for months before sporophytes appear.
After young sporophytes emerge, additional months may pass before they are large enough to transplant individually. The RHS notes that some young garden ferns may require one to two years before they are ready to plant outdoors. Tropical, slow-growing, specialized or difficult species may follow a different schedule.
Frequently Asked Questions
Are the brown dots under fern leaves the spores?
Usually the visible dots or lines are sori, which contain multiple sporangia. The spores themselves are microscopic and are released as fine dust. Some brown marks may have other causes, so identify the structure before collecting.
Do fern spores need to be buried?
No. Sprinkle them very thinly on the moist surface. Burying them can reduce light exposure and make it harder for the small gametophytes to establish.
How long do fern spores take to germinate?
It varies. Some may show green growth within several weeks, while others take months. Spore maturity, age, storage, light, temperature, water availability and species all affect the result.
Can I store fern spores before sowing?
Possibly, but longevity and suitable storage conditions vary among species. Peer-reviewed studies have found large differences in how fern spores respond to storage temperature, moisture and duration. Fresh spores are generally the simplest choice for a beginner unless species-specific storage guidance is available.
Can I use spores purchased online?
Yes, but do not assume that every packet is pure, viable or correctly identified. A packet can contain chaff, spores from another fern or material that has lost viability. Record the supplier and keep the final identification provisional.
Will spore-grown ferns look exactly like the parent?
Not always. Seed-like genetic variation can occur following sexual reproduction, and named cultivars may not remain true to type. Some hybrids or cultivars may also produce few viable spores. Vegetative propagation is generally more suitable when an exact clone is required.
Should I microwave compost or use bleach?
This guide does not recommend improvised microwave, oven or bleach recipes. Heating can be uneven and may damage containers or cause burns, while chemical concentrations and exposure times affect both safety and spore viability. The optional boiling-water surface treatment described by the RHS is included with heat-safety limitations.
Why do gametophytes need water for fertilization?
In the typical fern life cycle, the motile sperm must move through a thin film of water to reach an egg. This is one reason fern gametophytes are commonly associated with moist, protected microsites.
References
- Royal Horticultural Society. “How to Grow Ferns.” Includes guidance on collecting spores, treating compost, thin surface sowing, covering cultures and transplanting sporelings. View source
- USDA Forest Service. “Fern Reproduction.” Explanation of the independent sporophyte and gametophyte generations and the role of a water film in fertilization. View source
- University of California Botanical Garden at Berkeley. “Fern Reproduction.” Overview of sporangia, spores, prothalli, rhizoids and the fern reproductive cycle. View source
- Australian National Botanic Gardens. “Growing Ferns from Spores.” Practical sowing, temperature, indirect-light and potting-on guidance. View source
- Brooklyn Botanic Garden. Jones, Judith. “How to Grow Ferns from Spores.” Discussion of collection, contamination, sporangial debris and home propagation. View source
- British Pteridological Society. Publications and spore-exchange resources relating to fern cultivation, identification and pteridology. View publications and Spore Exchange
- Quintanilla, L. G., Amigo, J., Pangua, E. and Pajarón, S. 2002. “Effect of Storage Method on Spore Viability in Five Globally Threatened Fern Species.” Annals of Botany, 90(4), 461–467. DOI: 10.1093/aob/mcf224. View paper
- Pérez-García, B., Mendoza-Ruiz, A., Sánchez-Coronado, M. E. and Orozco-Segovia, A. 2007. “Effect of Light and Temperature on Germination of Spores of Four Tropical Fern Species.” Acta Oecologica. DOI: 10.1016/j.actao.2007.03.012. View paper
- Juárez-Orozco, S., Orozco-Segovia, A., Mendoza-Ruiz, A. and Pérez-García, B. 2013. “Spore Germination of Eight Homosporous Ferns in a Temperature Gradient.” South African Journal of Botany. DOI: 10.1016/j.sajb.2013.04.005. View paper
The practical conditions in this guide are starting points. Cultivation requirements for a particular species should be checked against current taxonomic, horticultural or conservation information.